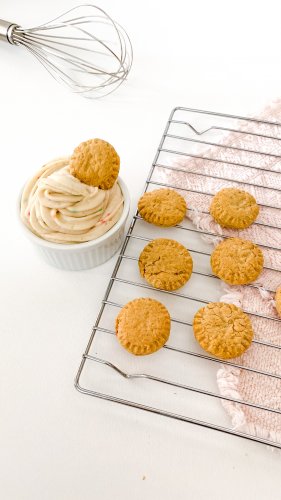
Vegan Dunk’Aroos
These little treats by Kaitlyn Dickie are so nostalgic. If you don’t know what Dunk’aroos are, you probably don’t live in Canada and for that, I feel bad for you. That being said, you should still make these and pretend you’re back in the second grade eating these out of a blue single-use plastic container with a small divider built-in for the icing. The funfetti variety is classic but you can get creative and make these into whatever you want! Not only did I want to make a homemade version of the original, but I also wanted to make it vegan. To do so, I looked up the ingredients of the originals online. To my surprise, I couldn’t even go off the ingredients list to figure out what the base was (icing, yogurt, whip cream, etc), because the ingredients list was FULL of chemicals. I went to the store and grabbed some coconut yogurt and knew that I could make a vegan icing base at home if I needed to. The experimenting began.
Directions for icing:
- Using an electric mixer, beat the butter until soft then add icing sugar and cake batter mixture until smooth.
- Add in the vanilla and coconut yogurt and stir until mixed.
- If you want the icing to be a little bit sweeter or thicker then add more icing sugar a little bit at a time.
- See variations below for coloring ideas.
Directions for cookies:
- In a medium bowl, combine the flour, baking powder, baking soda, cinnamon, and sea salt.
- In a separate bowl, cream the vegan butter and sugar together with an electric beater until fluffy.
- Add in the vegan egg and vanilla and stir until mixed.
- Slowly add the flour to the butter mixture until the dough is formed. Try not to overmix.
- Form a flat disk of dough and wrap it in some reusable saran wrap or between parchment paper with an elastic (I used Abeego beeswax wraps). Set in fridge to chill for 20 minutes to an hour.
- Remove the dough from the fridge and roll it out on a lightly floured surface if not using my tip. Roll the dough out as thin as possible (about 1/8 of an inch thick).
- Using a small cookie cutter of your choice, punch out shapes and transfer them to the prepared baking sheet.
- This next step isn’t mandatory but if you have an intricate shape or you want the cookies to hold their form then place them in the fridge for 20minutes to an hour before baking.
- Preheat oven to 350 C and bake the cookies for 5-8 minutes or until the bottoms start to get golden brown. Always start with the lowest recommended time and check frequently each minute after that.
- Remove from baking sheet and transfer to a cooling rack so they can get crispy.
- Serve and enjoy!
Kaitlyn Dickie What lights my fire? Pizza, vegan desserts, the mountains and the ocean! I love sharing tips and tricks on how to live a more kind-to-the-earth lifestyle so that we can enjoy our planet for decades to come. It’s not that hard, I promise! Come hang out with me on Instagram where I post everyday alternatives you can choose starting today! @kaitlyndickie